Draw3D Basics
Selections:
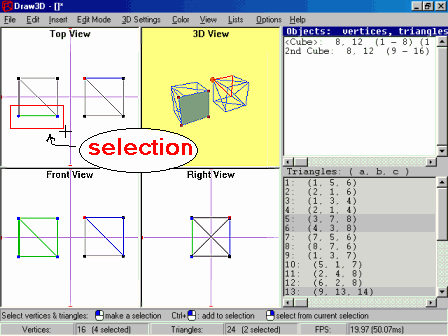
In Draw3D, most actions work on the current selection (all the vertices & triangles selected), or on everything if nothing is selected.To select items, either click on an object in the "Objects List", or select the vertices & triangles individually by hitting "S" on your keyboard to change to selection mode, and drag a rectangle around the vertices & triangles you want.
You can also hold the "Control" key (or "Ctrl" key) as you click on individual vertices in the "Vertices List" & "Triangles List", or holding the "Control" key as you right-click near vertices in any of the views.
Edit Modes:
There are 5 different editing modes, as shown in the "Edit Mode" menu. The helpbar on the bottom shows the different operations you can do in each mode. For example, in "Move" mode, dragging the left mouse button around will move the view.However, if you hold down the "Control" key on your keyboard, dragging the left mouse button around will move the currently selected vertices (or all vertices if nothing is selected).
The basic functions of each mode are:
- Edit mode (hit 'E'): Move individual vertices.
- Select mode (hit 'S'): Make a selection of vertices & triangles by dragging left mouse button.
- Zoom mode (hit 'Z'): Change an object's size, or zoom a view in & out.
- Move mode (hit 'M'): Move an object, or a view.
- Rotate mode (hit 'R'): Rotate an object.

Basic Tutorial:
To create 2 cubes, side by side:
- Create a new document (click on File->New, or hit 'Ctrl' and 'N')
- Insert a cube (click on Insert->Insert Cube, or hit 'I' then 'C').
The whole cube will automatically be selected. - Change to Zoom mode (click on Edit Mode->Zoom, or hit 'Z')
- Hold down the "Control" key on your keyboard, press the left mouse button somewhere in a 2D View (Top, Front or Side View), and hold the button down while you drag the mouse up a little. The cube should be about half the size it started.
- Change to Move mode (click on Edit Mode->Move, or hit 'M')
- Hold down the "Control" key on your keyboard, press the left mouse button somewhere in the "Front View", and hold the button down while you drag the mouse a little, until the cube is on the left hand side of the Front View.
- Since the cube is already selected, make a copy of it by pressing Edit->Copy and then Edit->Paste
(hit 'Ctrl' and 'C', then 'Ctrl' and 'V').
There should now be a second cube in the centre of the Front View.
Note: Whenever you Paste an object, Draw3D automatically changes to 'Move' Mode. - Hold down the "Control" key while you drag the new cube to the right side of the Front View.
- The "Objects List" shows that there are 2 objects (both cubes). To change the name of the 'Clipboard Object', double click on it or hit 'Enter'. Type in a new name, such as '2nd Cube'.
- It should be obvious now that there are 2 cube objects. To change the color of a cube, click on that cube in the Objects List (to select it's vertices & triangles), then hit 'C' (or click on Color->'Set Triangle Colors'). You should see a color selection window. Click on the color you want. (For a large color range, click on 'Define Custom Colors').
- To set the colors of the front face of a cube, change to Select mode (hit 'S', or click on Edit Mode->Select).
- In the Top View, hold down the left mouse button slightly above & to the left of the bottom left corner of one
of the cubes, and drag the mouse to below the bottom right corner of the cube, and release the mouse button.
If you selected some triangles, the 3D View should show the selected triangles as shaded, while the rest are just a wireframe.
If you didn't select the face properly, just try again. - Change the face's color (hit 'C', or click on Color->'Set Triangle Colors').

Cool 3D Effects:
If you look at the two images on the Screenshots page, you can see that the first car has a cool looking windscreen, and the second car has a cool looking body. Both those images used a special feature of Draw3D, called 'Color Effects'.To make the currently selected triangles look like that, click on Color->'Color Effects', and try either 'RainbowFX' or 'WaterFX',
depending on which one you prefer. If you rotate the 3D View (hit 'R' for Rotate Mode, then drag the mouse around), the colors change,
so you can find an angle that gives the best look, or it can look like an animation. If you change the 'Contrast' Mode (also in
the Color menu), you can also change what the effects look like.
This can look great when you want to save a picture of your 3D model!
To save the 3D View as an image:
To save the current 3D View as a BMP image, click on '3D Settings->Render to BMP file'.
(This requires Draw3D v4.1.1. For older versions, use the same method just below).
To save the 2D Views as an image:
To save a 2D View (or the whole screen) as a BMP image, hit the 'Print Screen' key on your keyboard (usually on the right of the F10 key),
open a painting program (such as Microsoft 'Paint', or 'Paint Shop Pro', etc), and click on 'Edit->Paste' (or 'File->New' and then 'Edit->Paste'),
because the whole screen will be saved as an image on the clipboard. (This can be used for any Windows program, since it is a feature of Windows!).
by Shervin Emami (http://shervinemami.info/aboutMe.html)