Making a Water-drop:
NOTE: This tutorial rquires atleast Draw3D v4.1.1. If you have a previous version of Draw3D, use the tutorial that came with Draw3D.
- Click on "File->New" (can press 'Ctrl' & 'N') to start a new file.
- We need to create the outline for the curve of the Water-drop, which can then be Swept (rotated) around the vertical Y axis (down the middle of the Front View), to create the 3D Waterdrop shape.
- To create an empty object, click on "Edit->Create a New Object" (can simply press 'N'). Press 'Enter' (or 'Return') to change the name of the new object. Type in something like 'Control Points'.
- To create a new curve, click on "NURBS Curve->Create a new curve" (or simply press 'U').
- Now you need to create the curve's control points, which give the curve its shape:
Click on "Edit Mode->Edit" (simply press 'E') to start editing at the vertex level. - Hold the 'Control' (or 'Ctrl') key down. Now if you click the left mouse button somewhere, it will create a vertice there, that will be part of the current curve. Create about 6 vertices in the 'Front View', as shown in the diagram.
Note: The vertices must be placed in order (either from top-to-bottom, or bottom-to-top)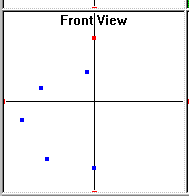
- Because you want the generated water drop to be closed both at the bottom and top, you need to make the X co-ordinate of the first and last vertices to a value of 0.
To do this, double-click on the X co-ordinate of your first vertex in the 'Vertices List' on the right side of the screen. If you can't see the 'Vertices List', right-click on one of the lists on the right side of the window, and click on 'Vertices List'.
(Instead of double-clicking on the X co-ordinate, you can use UP/DOWN and LEFT/RIGHT arrow keys to navigate the editable item in the current list, hit TAB to switch between the lists, and hit ENTER (or RETURN) to edit the value.)
Type in '0' as the X co-ordinate. The first vertex you created should now be red (meaning it is the current vertex) and it should be exactly on the vertical line in the Front View. Do the same for the last vertex you created (at the bottom of the 'Vertices List'). - You can play around with the curve if it isn't right. Right-click near a vertex to make it the current vertex, then drag it around by clicking the Left-mouse button in the position. Play around until the curve changes into your desired shape.
- Type in '20' for the 'Density' of the curve and hit 'Enter'. This reduces the number of vertices that will be created for the curve.
You can also change the 'Curvature' if you want, which makes the curve more smoother.
Finally, click on "NURBS Curve->Make vertices from curve" (or hit 'J'), to convert the curve into a mesh (lots of vertices).
A curve of 21 vertices should now be created. Notice that the vertices of the curve are blue because they are automatically selected, whereas the black vertices (for the curve's control points) aren't selected any more.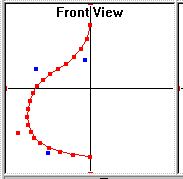
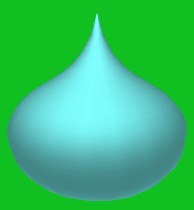
- Now that we have our outline, we can generate the 3D water drop shape. While the curve is selected, click on "Insert->Create a Sweep" (press 'I' followed by 'W') to create a new 'sweep' of the selected vertices rotated around the Front View. Use the default Sweep setting by hitting ENTER for the 'Object Properties'. A 3D water drop should now be generated.
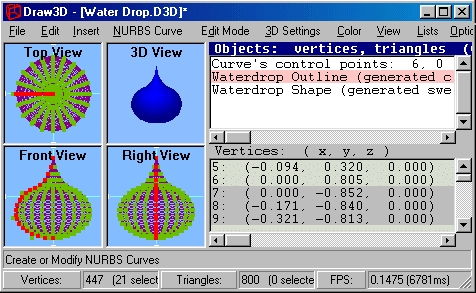
- To look at it in the 3D View, click on "Edit Mode->Rotate" (simply press 'R') to change to Rotate mode. (The vertices in the 3D View will automatically be hidden in Rotate mode). Play around with it in the 3D View by dragging the Left or Right mouse buttons in the 3D View. To show a better looking object, click on "3D Settings->Gouraud & Z-Buffer" (simply press '5') for the best possible rendering.
- Now that the body is selected, click on "Color->Set Triangle Colors" (simply press 'C') and select a nice water color.
- To see a bigger 3D View, click on "View->Show3D View only" to see it much larger. You can also click on "Edit Mode->Zoom" (simply press 'Z') and drag the left mouse button up/down in the 3D View to zoom in/out.
by Shervin Emami (http://shervinemami.info/aboutMe.html)