Making a simple House:
This tutorial explains how to work at the vertice / triangle editing level. This is the most basic drawing level, but is not necessarily the easiest or quickest, depending on what you are trying to draw.
![]() The house is made from a rectangular cube, with a triangular roof on top. (If you want, you can look at the completed version, in the file 'House.D3D')
The house is made from a rectangular cube, with a triangular roof on top. (If you want, you can look at the completed version, in the file 'House.D3D')
Steps:
(Remember, if you ever make a mistake, you can always undo it by clicking on 'Edit->Undo' (or hit 'Ctrl' & 'Z').
- Create a new file, by clicking 'File->New' (or hit 'Ctrl' & 'N')
- Insert a new cube, by clicking 'Insert->Insert Cube' (or hit 'I' then 'C')
- Make the cube a bit shorter but still the same width:
First, change to Zoom mode (click on 'Edit Mode->Zoom', or hit 'Z'). Notice the helpbar at the bottom shows that holding 'Shift' and any mouse button will "Scale the vertices in a direction". - Now hold down the "Shift" key on your keyboard, press the left mouse button in the middle of the Front View, and hold the button down while you drag the mouse up a little.
The cube should be about half the height it started, but with the same width & length.
- Create a new object for the roof, by clicking 'Edit->Create a new object' (or hit 'N').
- To change the object's name, double-click on the '<New Object>' in the Objects List on the right of the screen. (If you can't see the Objects List, right-click on a list on the right side of the window, and click on 'Objects List'). For the object's name, type "Roof".
- Create a corner for the top of the roof:
- First change to Edit mode (click on 'Edit Mode->Edit', or hit 'E'). Notice the helpbar at the bottom shows that holding 'Control' and left-clicking will "Plot a new vertice".
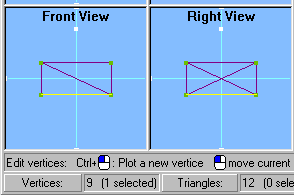
- Now hold down the "Control" key on your keyboard, and left-click in the Front View, above the rectangle, on the vertical cross-hair line. This should create an extra vertice at that point.
- If you look in the other views (3D, Top or Side Views), you should notice that the vertice is at the front of house, but you want it in the middle, to make a pointed roof.
To move it back to the center, left-click in the Top View in the center of the view, to move the vertice there.
When in 'Edit' mode, you can always move the current vertice (shown by a red plus sign) by left-clicking in a 2D view. - Notice that the vertices aren't shown in the 3D View, because the vertice you just created is selected (shown in the status bar, where it says 'Vertices: 9 (1 selected)').
When there are vertices selected, the 3D View only shows the selected vertice points, rather than all the points.
Click on 'Edit->Select None' (or hit the number '0') to de-select all vertices, to show all the vertice points in the 3D View. This will be helpful when creating triangles in the 3D View. - Create the first triangle for the roof:

- First create an empty triangle, by clicking on 'Insert->Add a new Triangle' (or hit 'T'). Now you need to manually set it's corners:
- While in 'Edit' mode (otherwise, hit 'E'), right-click in the 3D View near the front-top corner of the house. This is probably easier to do in Wireframe view, by clicking on '3D Settings->Wireframe' (or hit '1').
The front-left corner on the top of the house should now have a red plus sign in all views. - Now set the first corner of the current triangle to the current vertice by clicking on "Edit->Set polygon's corner" (or hit the 'Spacebar').
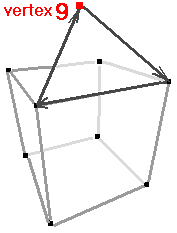
If you show the Triangles List (by clicking on 'Lists->Triangles List' or right-clicking in an existing list), you should see that in the last triangle (triangle 13), the first corner is vertice 3 (and the other two corners default to vertice 1). - Set the second corner of the triangle, by first right-clicking near the roof vertice, then pressing the 'Spacebar' to set it as the next corner.
You should see a line in each of the views showing there are now 2 corners, and the Triangles List should show the corners as: (3, 9, 1) - Set the third corner of the triangle, by doing the same for the front-right corner of the house.
There should now be a triangle for the front of the roof. (Triangle 13 is now vertices 3, 9, 7). - To change it's color, click on 'Color->Set triangle colors' (or hit 'C'), and choose a color (click on "Define Custom Colors" for more colors to choose from).
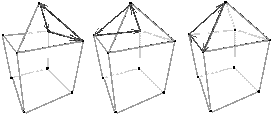
The next triangles created will also be that color. (To change the cube's color, hit 'C' again and choose the color for the cube. Don't forget to hit '0' again to de-select all vertices). - Now that you know how to create a triangle between 3 vertices, you should do the same for the 3 other triangles that make up the roof:

For each of the 3 remaing walls:
1) hit 'T' to create an empty triangle.
2) for each of the 2 top corners of the wall and the roof vertice, right-click on the vertice (in any view) and hit 'Space'.
(anytime you make a mistake, you can hit 'Ctrl' & 'Z' to undo any of your actions).
by Shervin Emami (http://shervinemami.info/aboutMe.html)